how toGlitch & GitHub
If you’re tackling this content in order, you should have already read the introduction to Glitch and GitHub and created accounts for both.
Now, you’ll learn how to create projects on Glitch and connect them with GitHub. Doing this is helpful for a few reasons:
- It creates another copy of your code on GitHub (think of it as a backup of what’s on Glitch).
- It provides you with experience using git commands and GitHub, both of which are commonly used in modern web development.
Note that it’s entirely possible to use Glitch without GitHub and to add non-Glitch projects to GitHub; they’re not necessary for each other, but they are complimentary. As part of this course, you may create Glitch projects just for your own experimentation and those will not need to be shared with GitHub. However, every graded project will be on both Glitch and GitHub so I can easily review and comment on your code.
👉🏻 Please note that this will go most smoothly if you have an uninterrupted 30 minutes to work through these steps from start to finish.
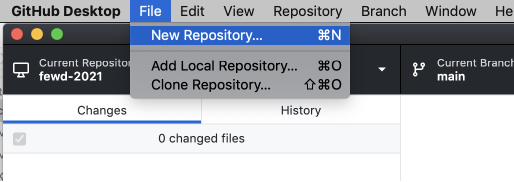
Step 1: Create a new repository
Open up the Github Desktop app that you installed in the GitHub tutorial, and select New Repository… from the File menu:
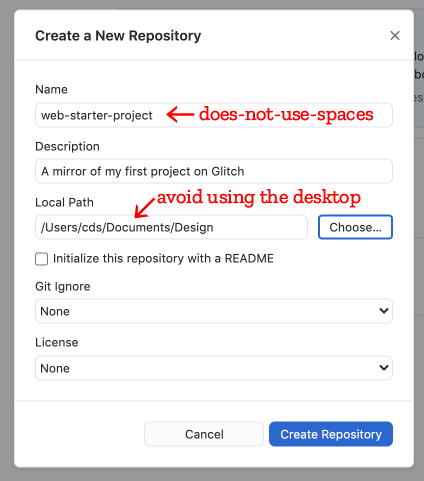
It will prompt you to enter some information that it will use to create a project folder on your computer. It’s important that name you choose doesn’t contain any spaces or other punctuation aside from hyphens - or underscores (_) since a surprisingly large amount of code will get confused by those sorts of names. You should apply this same ‘no spaces’ rule to all the folders in the full ‘path’ to the repository you’re creating. For instance, here I’m creating a repo named web-starter-project and placing it in the folder /Users/cds/Documents/Design:
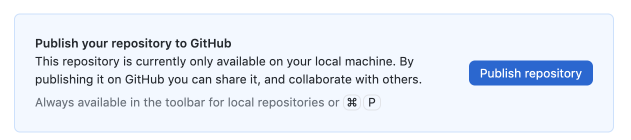
Once you click the Create Repository button, it will create the folder locally, but if you go to your page on github.com you won’t be able to see it yet. To make it public you must first Publish the repository by clicking the blue button:
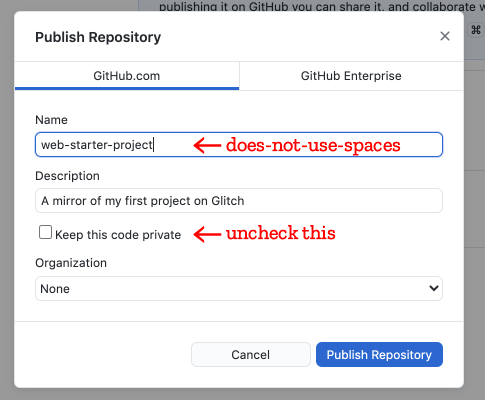
This will give you another dialog to configure your settings. By default it will use the same name that you entered when you created the repository but there’s no requirement that the copy on your computer matches the one on GitHub (though it will make things less confusing if they match). In addition to adding a description that will help you and others make sense of what the repository contains, make sure the ‘Keep this code private’ option is not selected. Otherwise, neither I nor anyone else will be able to see what you’re working on.
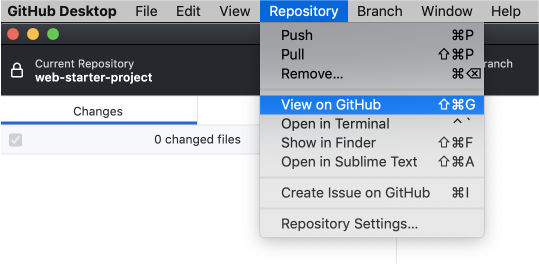
Once you click the Publish Repository button and the app reports that it was successful, you should now be able to see your brand new (empty) repository on the website. As an easy shortcut you can go to the Repository menu in the app and choose View on GitHub. (Note that the items in that menu to reveal the project in the Finder or open it in your editor of choice are also quite useful.)
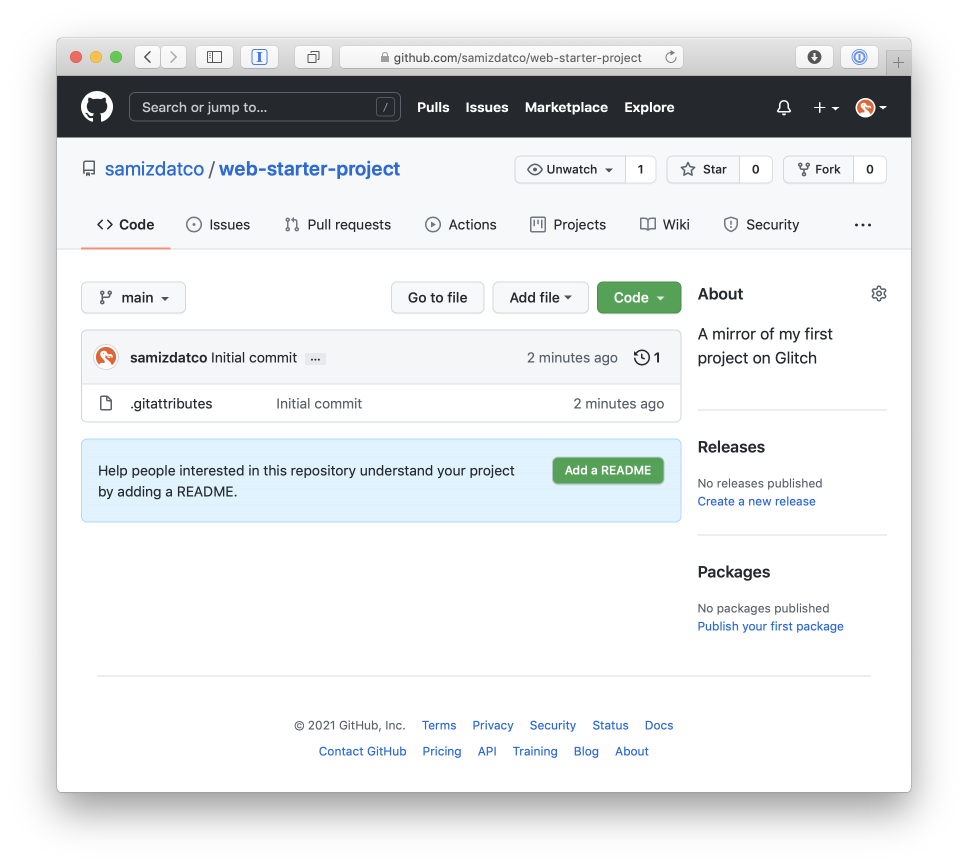
After choosing ‘View on GitHub’ you should see a page similar to this in your browser, although in your case the text that says samizdatco will be your username and web-starter-project will be whatever you chose when publishing the repo.
Step 2: Remix a project on Glitch
👀 I have also created a step-by-step video (2mins) of this process. The video does not cover all the info in the text below, though, so you should still read through the instructions.
Next, open a new tab or browser and go to Glitch and log into your account. Open up my starter project and remix the project:
As you can see above, the original project is named mica-web-starter and then a copy is created with the dynamically generated name south-shell-shoemaker. In your remix, you can rename this project to something more relevant or keep the creative name Glitch has assigned.
Both GitHub and Glitch have the concept of taking existing work and creating your own copy or version; on GitHub, this is called forking ✳️ and on Glitch it’s called remixing. ✳️ As you can see in the above screen capture, you can copy your own work as well as other people’s.
Now you have a project on Glitch and a repo on GitHub and are ready to connect them both.
Step 3: Connect Glitch to GitHub
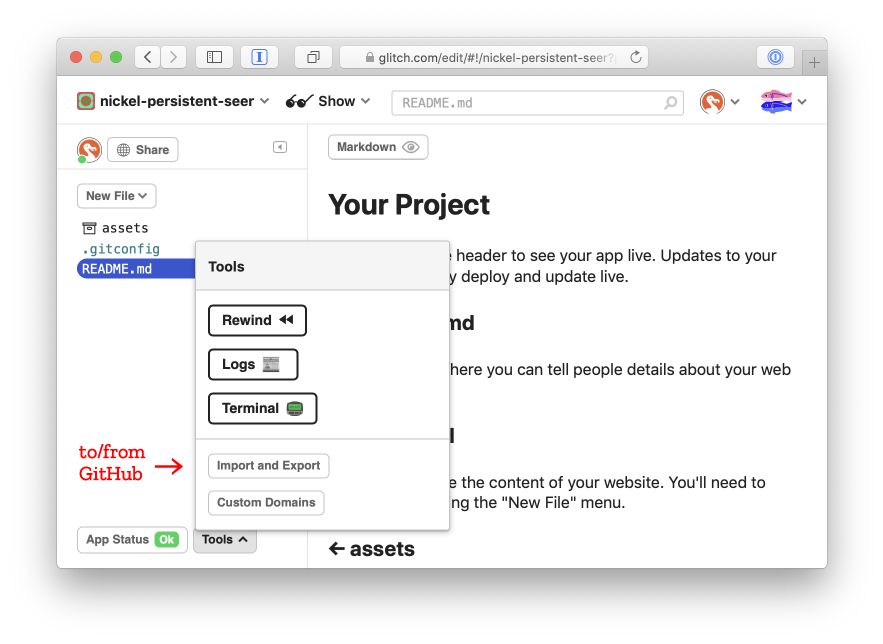
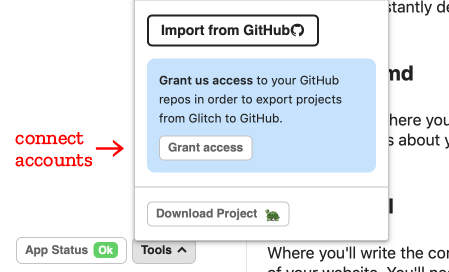
Glitch actually uses git internally and has some super-handy integrations to make moving your code to-and-from GitHub fairly seamless. The features are kind of hidden though, you need to click on the Tools menu in the lower left corner of the Glitch page and then select Import and Export from there:
Our next step is to copy the code in the Glitch starter project into the repository we created in Step 1. But to do that, Glitch needs your permission to be able to write files into the repository. Click the Grant Access to get the process started:
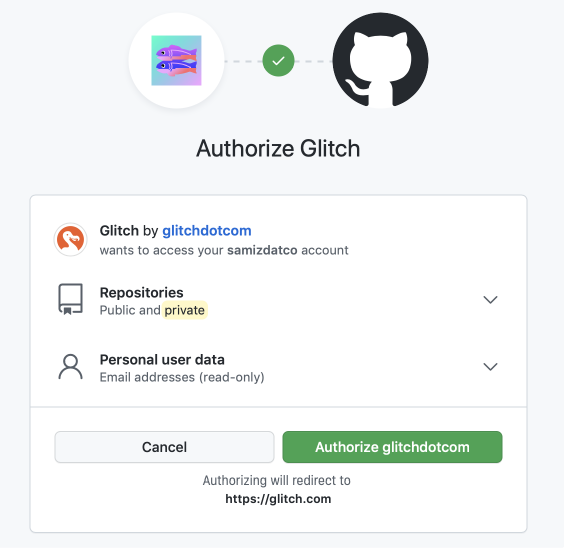
This will bring up a confirmation dialog from GitHub allowing you to Authorize Glitch to read and write from your repositories. You’ll only have to set this up once and in the future you’ll be able to access both the Import and Export buttons in the Tools menu of any of your Glitch projects.
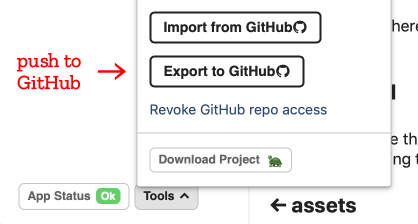
Now that your Glitch and GitHub accounts have been linked, go back to the Import and Export menu and this time click on the Export button:
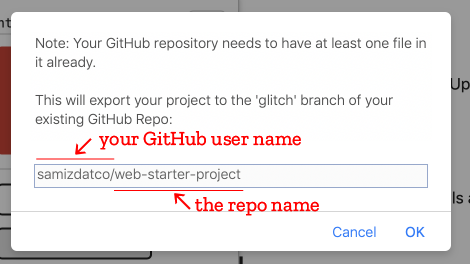
This will pop up a dialogue asking you for the username/repository-name combination that it should copy the project’s files into. These are the two pieces of text at the top of the GitHub page we opened a few steps ago. Make sure you’ve got the right combination of names and then click OK:
Step 4: Update the Repository on GitHub
The export step we just kicked off doesn’t immediately overwrite the contents of your repository on GitHub (that would be dangerous!). Instead it creates what is called a ‘Pull Request’ in git lingo. In git’s conception of things, there can be many different copies of a repository on different computers, on other servers like Glitch, and then the canonical copy on github.com. When you move files from one of these to another, you’re ‘pushing’ the changes you’ve made. To update your local copy so it matches what’s on the server, you ‘pull’ those changes down.

- fetching or pulling references bringing code from your repo into your working project
- pushing is going in the other direction – moving code from your working project into your repo
This is explained in more detail in Git and GitHub in Plain English.
A pull request is a kind of in-between zone where one computer has offered some changes to be pushed, but the owner of the repository has a chance to either confirm or deny whether to pull those changes in. If you open the page for your repository in the browser, you’ll see that Glitch Export we just ran has caused this message to appear at the top of the screen:

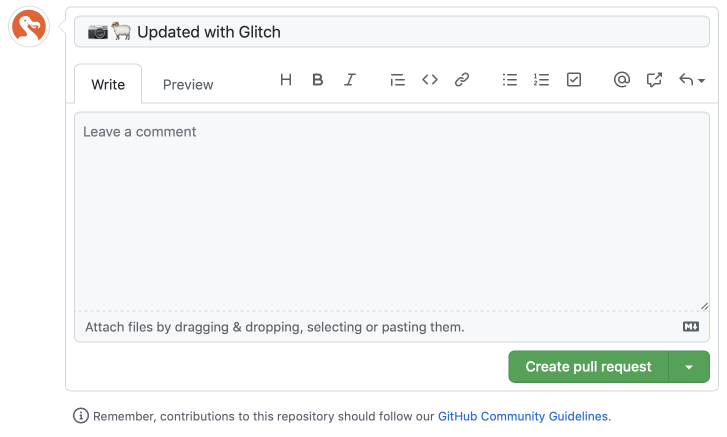
Clicking the green button to Compare & pull request will let you inspect the changes, leave a comment to future-you about what the changes entail, and approve the modifications. For now, let’s just leave the “Updated with Glitch” message as-is and click the request by clicking the green button:
Now that the pull request exists, all we need to do is Merge it with the existing files in our repository…
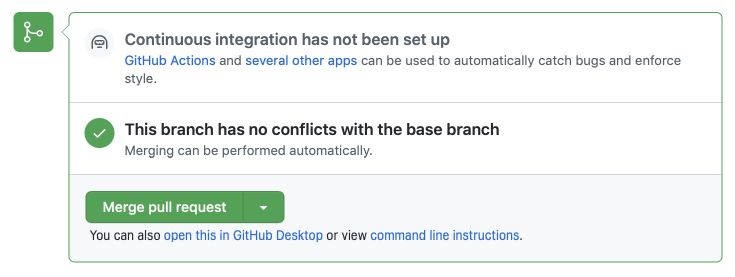
…confirm that we’re really sure we want to do this:

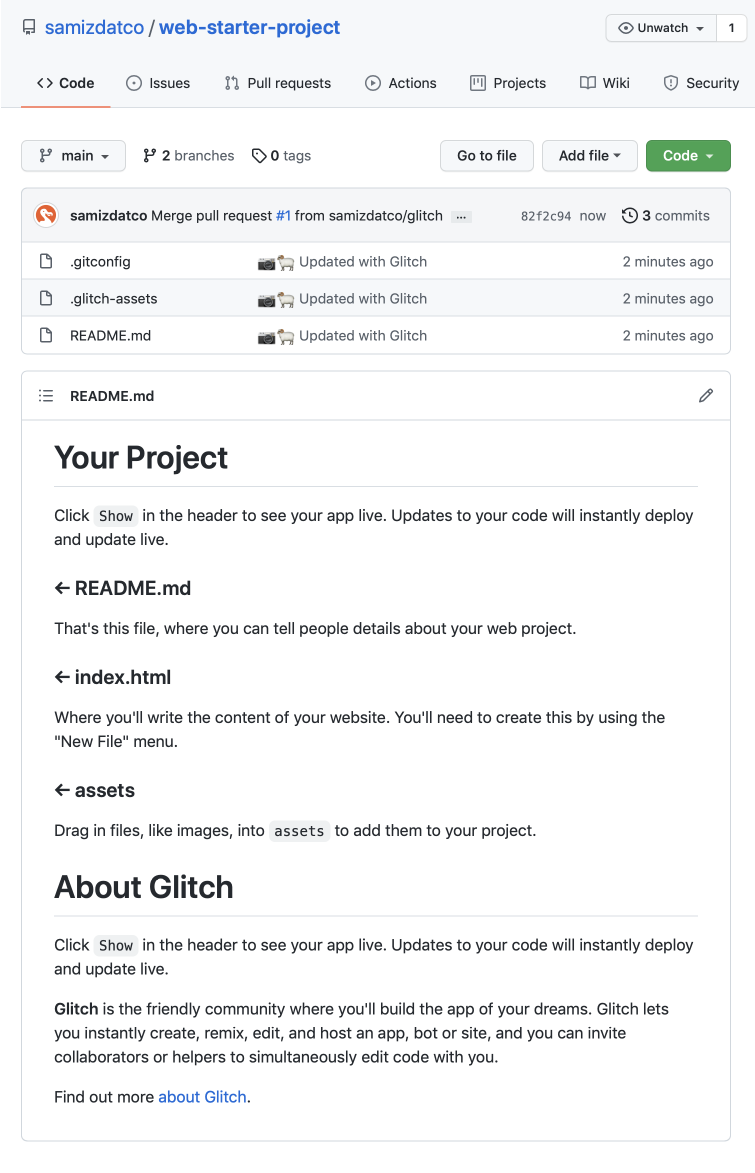
… and that’s it, we’re done! Gaze upon your repository page in all its in-sync-with-Glitch glory:
Step 5: Your first git commit
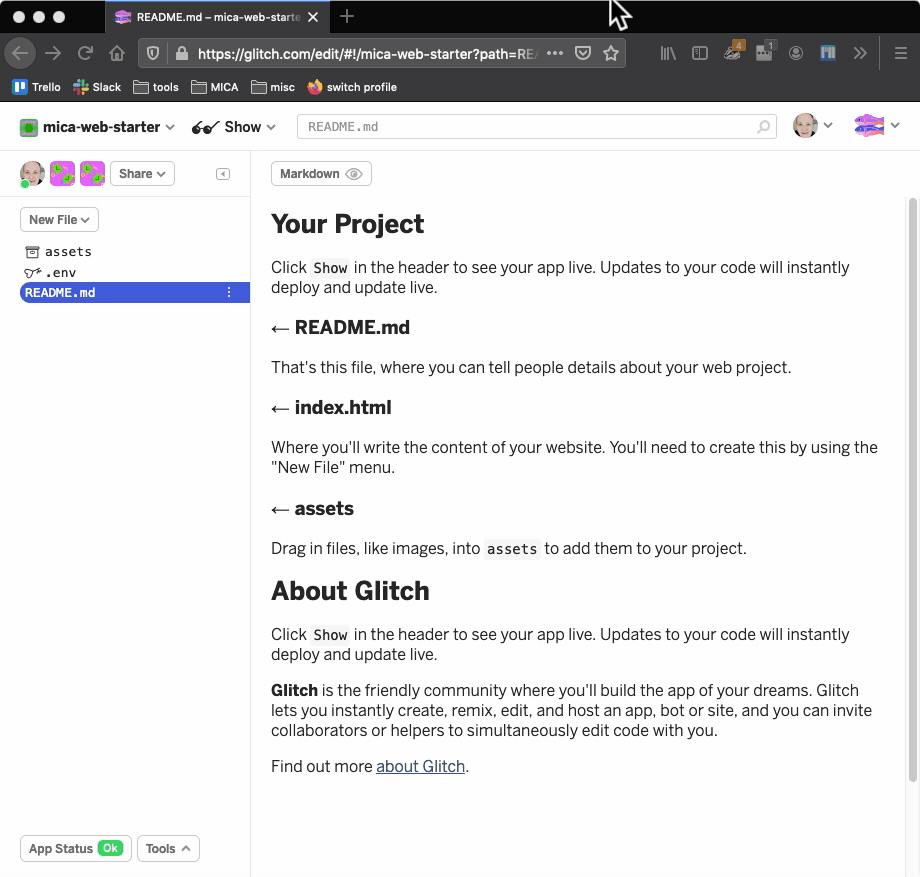
Go back to the Glitch project where this all began and open the file named README.md. The .md file extension lets you know that this is a ‘markdown’ file and by default Glitch shows you this kind of document in ‘preview’ rather than ‘edit’ mode. To switch into edit mode and see the underlying marup, click on the button that looks like:

At the top of the file, create a new line and add some text.
This text can be anything, even just the word “testing.” Just remember that we’re going to push this change to GitHub, so it shouldn’t be private or embarrassing. 🙈
Now go back through the procedure in steps 3 & 4 to Export that one-line change. At the end of the process confirm that you see your newly added line of text on GitHub as well as Glitch.
That’s it! You’ll be using this demo project and repo throughout the course to practice things, and you’ll repeat this process to create new projects and repos for each of your graded projects. But those are tasks for future-you; right now, you should get up, stretch and take a break. 😀